I make my living primarily by supporting Microsoft products, and I genuinely think their technology is quite good. But every now and then they make decisions so monumentally stupid that they need to be called out for them; “Connected Standby” is one of those instances.
Connected Standby is a new power mode in Windows 8 or 8.1 designed for tablets which essentially allows them to enter sleep mode but keep just enough functionality active so they can receive e-mails, keep their DHCP leases, etc. In other words, you’re in standby but still “connected.” This is of course to help battery life and create a more smartphone-like experience. Fine, I’ve got no arguments there.
The problem is what causes the system to go into this mode, or more accurately what prevents it from doing so. Apparently there’s an entire sub-system that manages this, the Desktop Activity Moderator. Whatever is happening under the hood though, the only thing that seems to keep the system from sleeping is user activity: mouse, touch, or keyboard input. In theory that’s fine, but try doing an OS deployment to a system that goes to sleep after ten minutes and see how well that works. Just to be clear, a “connected standby”-capable tablet will go to sleep during the OS deployment process while using Microsoft Deployment Toolkit (MDT) 2013.
Compounding this problem there’s no obvious way to disable connected standby. It’s supposed to be transparent to applications and thus there shouldn’t be a need to turn it off. Yeah, anyway. Fortunately, after a lot of research and a lot of trial and error, I was able to disable this “feature” while imaging a system.
A “connected standby”-capable device should by default have only a “balanced” power scheme available. We need to make changes to this scheme during the imaging process, taking note of the fact that the setting which controls connected standby is actually the display timeout, not the sleep setting. We can do this by calling a batch file during the deployment task sequence, which itself will use powercfg.exe to change the power settings.
First, save the below to the Scripts folder of your Deployment Share(s) as CHANGEPOWERSETTINGS.BAT.
REM Set the display timeout
powercfg /setacvalueindex 381b4222-f694-41f0-9685-ff5bb260df2e 7516b95f-f776-4464-8c53-06167f40cc99 3c0bc021-c8a8-4e07-a973-6b14cbcb2b7e 0
REM Set the sleep timeout
powercfg /setacvalueindex 381b4222-f694-41f0-9685-ff5bb260df2e 238c9fa8-0aad-41ed-83f4-97be242c8f20 29f6c1db-86da-48c5-9fdb-f2b67b1f44da 0
REM Activate this power scheme
powercfg /s 381b4222-f694-41f0-9685-ff5bb260df2e
By using /setacvalueindex we are changing the timeouts when the device is on AC (line) power for the specific settings referenced by the GUIDs. Setting the timeout to “0” disables that particular power setting. Note that despite the “balanced” scheme already being active (by virtue of it being the only scheme), we still need to “activate” it for the new settings to take effect. Also, since we’re making changes to the AC values only, this should have no effect on a device running on battery power.
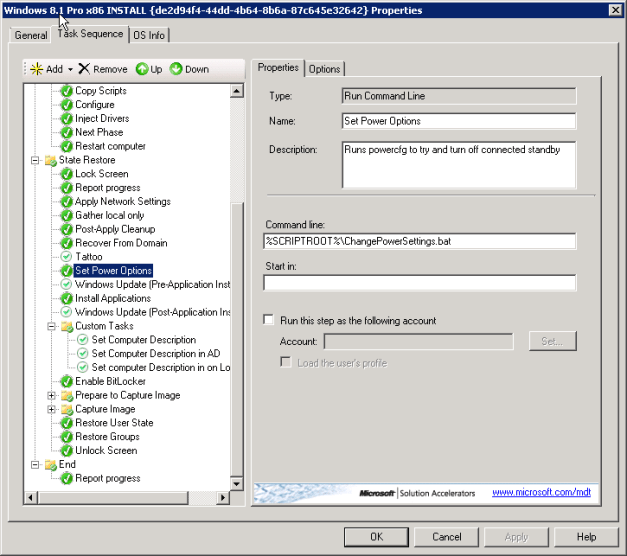
Next we need to add a task to our deployment task sequence in Deployment Workbench. Here, I’ve added “Set Power Options,” which is a “Run Command Line” task that simply calls the batch file we created above. I chose to put this between “Tattoo” and “Windows Update (Pre-Application Install)” because it was during the initial Windows Update task that the systems were going to sleep. On the options tab, you can choose if the task should continue on error; at this point I am not doing so since the task itself will fail when the system goes to sleep anyway. Once we start testing 8.1 on the desktop or devices that do not use connected standby, I may need to revisit this option.
Depending on your preferences once the deployment is complete, you may want to create another task near the end of the sequence to re-enable connected standby on AC. We use 3rd party power management software however, so I’m not too concerned about how this is set once the system is up and running.
Hopefully this helps some of you out. And Microsoft, please, when you add new features like this – give us administrators an easier way to decide how we want the device to work. Stopping a system from going to sleep should not require digging around for obscure and illogical settings.

I set up something like this, only I was setting the active power to Max Performance (as I’m dealing with servers). I would recommend using a VBScript to do this so that you can have some error checking in your command. Here’s my (super slimed down, no commented script).
This way it will log to your SLShare and C:\Windows\Temp folder if you need to go back and check to see that this processed.
Option Explicit
Dim iRetVal
On Error Resume Next
iRetVal = ZTIProcess
ProcessResults iRetVal
On Error Goto 0
Function ZTIProcess()
Dim sCommand
Dim sConfigname
sConfigName = “Config-OSPowerCFG”
oLogging.CreateEntry sConfigName & “: Starting ” & sConfigName, LogTypeInfo
‘//Set Commands to run
sCommand = “powercfg -setactive 8c5e7fda-e8bf-4a96-9a85-a6e23a8c635c”
‘//Run commands
iRetVal = oShell.Run(sCommand)
oLogging.CreateEntry “Running ” & sCommand, LogTypeInfo
oLogging.CreateEntry sConfigName & “: Return code from command = ” & iRetVal, LogTypeInfo
oLogging.CreateEntry sConfigName & “: Finished ” & sConfigName, LogTypeInfo
End Function
LikeLike
Crap. It took some of my blocks and removed them. Those are important..
At the top:
At the very bottom:
LikeLike
Makes a lot of sense, thanks for the reply!
LikeLike
Pingback: The Myth of the Low-Cost Windows Alternative | Trials of a Network Admin
How would you go about re-enabling?
LikeLike
I think it would just be a matter of changing the “0” in the commands to your desired timeout, but haven’t tested it. As mentioned we use 3rd party software for power management. Good luck!
LikeLike