More on our continuing saga to deploy Windows 8.1 via MDT…
I thought we were done, with a fully-functional MDT deployment that installed Windows 8.1 exactly the way we wanted. And in a sense, we were, until we started pushing a few applications. One of these applications failed during a silent install with a generic error, and when I manually attempted the install it quickly became obvious what the problem was…the app required the .NET 3.5 Framework.
Now, the .NET Framework is typically delivered as a redistributable runtime along with apps that require it, however on Windows 8 / 8.1 it has been moved to a “feature” that must be installed through “Programs and Features” in the control panel. If you interactively try to install an app that requires the runtime, Windows is smart enough to catch that and prompt you to add the feature. That may or may not work without additional intervention, depending on if your install has access to a full Windows source or can find what it needs from Windows Update or WSUS, but it certainly does not work during a silent install.
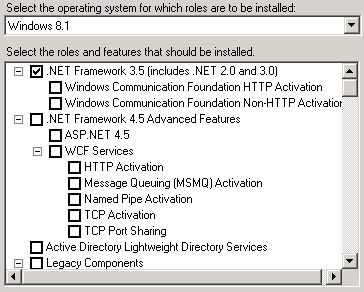
There’s a few ways of dealing with this, but I really wanted to add the feature as part of our deployment process. That way, we know it’s installed everywhere. I was pleased to find out MDT 2013 (and I believe 2012 as well) offers “Install Roles and Features” as a pre-canned task step. I added it within the “State Restore” section, just before Windows Update runs.

When you add this step, you can then choose the target OS and select the roles and features you want added.
Easy, right? It never is though, is it?
Once I added this step and re-tested the deployment, we started getting prompted to select roles and features during what should have been a silent deployment. This happened very early in the deployment process, not even where one would have expected based on its location in the task.
The fix for this was pretty straightforward. In our customsettings.ini file, I added one line to the [Default] section:
SkipRoles=YES
Note that YES must be capitalized. Once this was done the prompt went away and the deployment was back to being silent.
Of course, that still didn’t fix things. Before I go any further I should point out we use SpecOps Deploy which acts as a wrapper around MDT, and it’s possible the error we ran into is a result of something the SpecOps people are doing. I will touch base with them and if they have any feedback I’ll update this post accordingly. And just to be clear, I’m a big fan of SpecOps Deploy; you can see a case-study they did on us here.
Anyway, I started getting a “Path Not Found” error from ZTIOSRoles.wsf, which is the script that gets called when you add the “Install Roles and Features” task step. Based on the BDD.LOG file that MDT generates it was clear ZTIOSRoles.wsf was generating this error within its GetSource function.
Function GetSource
   ' By default, assume any needed files (e.g. NetFx3) can be loaded from WU or WSUS.
   GetSource = ""
   ' If the user explicitly set WindowsSource, copy the files locally,
   ' pass the value along via the source switch, and limit access to
   ' the internet.
   If oEnvironment.Item("WindowsSource")  "" then
	oUtility.ValidateConnection oEnvironment.Item("WindowsSource")
	If not oFSO.FolderExists(oUtility.LocalRootPath & "\sources\" & oEnvironment.Item("Architecture")) then
	   oLogging.CreateEntry "Copying source files locally from " & oEnvironment.Item("WindowsSource"), LogTypeInfo
	   oUtility.VerifyPathExists oUtility.LocalRootPath & "\sources\" & oEnvironment.Item("Architecture")
	   oFSO.CopyFolder oEnvironment.Item("WindowsSource"), oUtility.LocalRootPath & "\sources\" & oEnvironment.Item("Architecture"), true
	End if
	GetSource = oUtility.LocalRootPath & "\sources\" & oEnvironment.Item("Architecture")
	' If the SourcePath value was set (typically in LTI via ZTIUtility.vbs),
	' copy the files locally, pass that path along via the source switch,
	' and limit access to the internet.
   ElseIf oEnvironment.Item("SourcePath")  "" then
      oUtility.ValidateConnection oEnvironment.Item("SourcePath")
      If not oFSO.FolderExists(oUtility.LocalRootPath & "\sources\" & oEnvironment.Item("Architecture")) then
	 If oFSO.FolderExists(oEnvironment.Item("SourcePath") & "\sources\sxs") then
	    oLogging.CreateEntry "Copying source files locally from " & oEnvironment.Item("SourcePath") & "\sources\sxs", LogTypeInfo
	    oUtility.VerifyPathExists oUtility.LocalRootPath & "\sources\" & oEnvironment.Item("Architecture")
	    oFSO.CopyFolder oEnvironment.Item("SourcePath") & "\sources\sxs", oUtility.LocalRootPath & "\sources\" & oEnvironment.Item("Architecture"), true				GetSource = oUtility.LocalRootPath & "\sources\" & oEnvironment.Item("Architecture")
	 Else
            oLogging.CreateEntry "SourcePath was set, but " & oEnvironment.Item("SourcePath") & "\sources\sxs does not exist, not using local source.", LogTypeInfo
	 End if
      End if
   End if
End Function
Sorry the code block looks horrible…I’m still learning how to handle code with WordPress.
After adding some debug logging of my own (not shown here) I established the error was being generated by the oFSO.CopyFolder line bolded above. That line attempts to copy the “sxs” folder that contains the .NET binaries from the deployment share to the local PC. Frustratingly, after more debugging it seemed both the source and destination path did exist, so I was at a loss as to why the error was being generated. I’ve run into similar problems before with this function in vbScript, and there doesn’t seem to be a good way of troubleshooting what’s actually happening within CopyFolder.
I ended up with a bit of a hack as a workaround. I replaced the entire ElseIf block with the below:
ElseIf oEnvironment.Item("SourcePath") = "" then
   oUtility.ValidateConnection oEnvironment.Item("SourcePath")
   GetSource = oEnvironment.Item("SourcePath") & "\sources\sxs"
End if
Basically, instead of trying to copy the binaries locally, we’re just telling the script to use the networked copy. I have no idea why this isn’t done by default, unless there’s some side effect that I’m not thinking of. For now at least, this is working fine.
Hope this helps someone!