Microsoft offers certain K-12 school districts Office 365 licenses for students and faculty at no charge. This includes online versions of the Office suite, Exchange online, 1TB of OneDrive storage, SharePoint, Yammer and Lync. If one were starting from scratch you could pretty much use Office 365 for your entire storage and messaging infrastructure with no cost. Of course, most of us are not in that position and are already running some of these services on-premise, possibly with others in the cloud.
In our case, while we are using Office 365 for Yammer and as our back-end for Lync, we have Exchange on-premise for staff. We wanted to use Office 365 for student e-mail, but while we’re on Exchange 2013 and thus could support a hybrid deployment, we felt that was introducing unnecessary complexities. We also had no interest in touching our existing, fully-functional e-mail system.
We elected to purchase a new domain for our students, so the challenge became getting that domain up and running with our existing Office 365 setup, including ADSync and Single-Sign-On via ADFS. This post addresses how we went about doing so. It will be light in details in certain areas but hopefully help with the more complicated steps.
To start, you’ll need to purchase the new domain; we went with something that clearly identified these users as students. Once that’s done, add it to your Office 365 setup. You’ll need to have specific DNS entries added to validate your ownership of the domain, then setup the proper MX and related records.
Next, you will need to add a new UPN suffix (matching the new domain) to your on-premise Active Directory.
All users who will be using that new domain need to have their UPN suffix changed in your on-premise AD. This can be scripted through VBScript (which is what we used) or PowerShell.
Now you’ll need to re-sync your whole AD to the cloud so that the change to the UPNs take place, but there’s one important caveat: If your users already have a federated domain as their UPN, you cannot change their UPN directly from one federated domain to another federated domain. This isn’t clear from any documentation I could find, and the sync will complete successfully with the only indication of a problem being one warning, from FIMSynchronizationService, eventID 6105:
“The management agent “TargetWebService” step execution completed…but some objects had exported changes that were not confirmed on import.”
After a lot of unnecessary (and unproductive) troubleshooting, I stumbled on this post on the Office 365 community which points to the solution: change the UPN of any affected users back to the default “domain.onmicrosoft.com” suffix, sync your on-premise AD to the cloud, the change the UPN a second time to the new desired federated domain suffix, and finally sync one last time.
With that resolved, if you are using ADFS for SSO, you’ll need to update it to account for the new domain. A default installation of ADFS 2.0 does not support multiple top-level domains; you’ll receive the error “…federation service identifier specified…is already in use.” This can be fixed relatively easily by following MS KB #2618887. I was worried about this step but it took all of two minutes and did not cause any issues at all.
At this point, if everything is setup properly you should be able to use SSO to access Office 365 with valid credentials from any of your federated top-level domains. Now you’ll want to bulk license Office 365 users.
There are a few parts to bulk licensing. Before you can do any of this you need to connect to Office 365 using the Microsoft Online Services Module for PowerShell. Enter your administrator credentials for Office 365 when prompted.
$cred = Get-Credential
Connect-MSOLService –Credential $cred
The first thing we need to do is set a location for our users. Note “US” must be capitalized, and obviously if you’re not in the US, you’ll need to substitute the proper country code. We’re only touching the unlicensed users here since you probably have users that are already setup, and the –All parameter is important so the results are not truncated.
Get-MsolUser -UnlicensedUsersOnly -All | Set-MsolUser -UsageLocation US
Now we need to figure out what licensing we want to assign. Your results may differ depending on what you may have purchased.
Get-MSOLAccountSku | select AccountSkuID
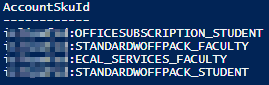
| ECAL_SERVICES_FACULTY |
Exchange Archiving, Exchange Online Protection |
| OFFICESUBSCRIPTION_STUDENT |
Office Pro Plus Licensing for Students |
| STANDARDWOFFPACK_FACULTY |
Office 365 A2 License – Faculty |
| STANDARDWOFFPACK_FACULTY |
Office 365 A2 License – Students |
This will list the different licensing packages available to you, but most likely you’ll want further detail. For each AccountSkuId shown you can run the below command to see the individual products and services. (Substitute whichever SKU you want for ‘STANDARDWOFFPACK_STUDENT’ below.)
Get-MsolAccountSku | Where-Object {$_.SkuPartNumber -eq ‘STANDARDWOFFPACK_STUDENT’} | ForEach-Object {$_.ServiceStatus}
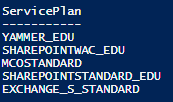
These are the specific products and services that can be licensed under the top level SKU.
| EXCHANGE_S_STANDARD |
Exchange Online |
| MCOSTANDARD |
Lync |
SHAREPOINTWAC_EDU
SHAREPOINTSTANDARD_EDU |
SharePoint and OneDrive for Business (Must be licensed together.) |
| YAMMER_EDU |
Yammer (does not require explicit licensing) |
If you want to selectively enable portions of the SKU, you need to license the SKU and disable the services you do not want. We do that by setting Licensing Options. In this example we are disabling Lync and Exchange. Note you’ll need to use the full AccountSkuId (including the prefix) in the command below.
$options = New-MSOLLicenseOptions -AccountSkuId organization:STANDARDWOFFPACK_STUDENT -DisabledPlans MCOSTANDARD,EXCHANGE_S_STANDARD
You then assign the license with Set-MSOLUserLicense, but to do this in bulk we have to first filter the users to whom we want to assign licenses. In this case we’re assigning student licenses to users with the student domain we setup earlier, then we will pipe that output to the Set-MSOLUserLicense command. Note “studentdomain” is the domain suffix you’ve setup explicitly for these users, and does NOT include the “@” symbol. (We’re splitting the UPN at the “@” and taking only the part to its right.)
Get-MSOLUser -All -UnlicensedUsersOnly | Where-Object { $_.userPrincipalName.Split(“@”)[1] -eq “studentdomain” }
Incidentally if you want to get a count of those users, you can enclose the entire command in parenthesis and append .count to the end. i.e. (command).count
The above command will only show the impacted users. To actually assign licenses we need to pipe this output to Set-MSOLUserLicense as follows:
Get-MSOLUser -All -UnlicensedUsersOnly | Where-Object { $_.userPrincipalName.Split(“@”)[1] -eq “studentdomain” } | Set-MsolUserLicense -AddLicense organization:STANDARDWOFFPACK_STUDENT -LicenseOptions $options
You can repeat that command if you need to assign additional licenses (for instance, the Office subscription) but keep in mind you’ll have to remove –UnlicensedUsersOnly since these users are now licensed. We also found adding the second license generated a lot of errors about the license being invalid, but given enough time everything did completely successfully and all of our users were licensed properly.
The overall process is a little tedious, but when you consider what Microsoft is giving away for free, it’s well worth the trouble. Hopefully this posts makes things a bit easier.


