One of the frustrations we’ve found with Office 365 is provisioning new AD users becomes a multi-step process:
- Add user to AD
- Wait for DirSync to sync the new user to Office 365
- Log in to O365, license new user as needed
In an environment where new users are infrequent this would be fine, but we’re K-12; students move into the district pretty regularly, so we’re always adding new users. And to complicate matters, the people creating these new users are outside of IT, thus they neither have permissions to administer O365 nor would they necessarily be able to do so reliably if they were given permission.
I wanted to automate this process as much as possible. You can administer Office 365 with PowerShell, so that’s the obvious (and AFAIK only) approach.
Before we get into the meat of this task, please review my post about how to determine what licenses are available to you, as you’ll need this info to modify the sample script I’ll provide later on.
We’re ultimately going to create a scheduled task to run a PowerShell script, so start by determining what server you want to run the task on. You’ll need to install:
- Azure AD PowerShell Module, which has a few prerequisites of its own, shown at that link.
- PowerShell 4.0
Note that I setup this task on the same server I’m using for DirSync, so it’s possible there are other required components that were already present on my system.
To automate this process we’re going to need to store credentials that can administer Office 365. The easiest way I found to do this is from this blog post at BSonPoSH. The important thing here is you must log on to the server and run the below code with whatever account you intend to use to run the scheduled task. That’s because the credentials file created can only be decrypted by the user who created it. Update the path shown below if you need to.
$Credential = Get-Credential
$credential.Password | ConvertFrom-SecureString | Set-Content "C:\Program Files (x86)\LicenseO365\cred.txt"
When you run this you’ll be prompted to enter credentials that can administer your Office 365 tenant.
Here’s the actual licensing script; I’ll comment on it below.
# LicenseStudentsForO36SchedTask.ps1
#
# Task to automatically license newly added domain users
#
# Copyright 2014, James F. Prudente, except for code sections attributed to others.
# Free to use and distribute in its entirety. Please do not remove attributions.
# Use at your own risk!
# Taken from http://www.methos-it.com/en/blog/powershell-function-to-check-for-a-loaded-module
function Check-LoadedModule
{
Param( [parameter(Mandatory = $true)][alias("Module")][string]$ModuleName)
$LoadedModules = Get-Module | Select Name
if (!$LoadedModules -like "*$ModuleName*") {Import-Module -Name $ModuleName}
}
# Path to log file location
$basepath = "c:\program files (x86)\LicenseO365\"
# Log file with current date and time
$logfile = $basepath + "NewUsers_" + (Get-Date).tostring("MM-dd-yyyy-hh-mm-ss") + ".log"
# Set to $true if you want to create e-mail addresses for new users
$enableEMail = $false
# The domain suffix for your new users
$domainSuffix = "domain.suffix"
# This is a temp file, no need to change anything here
$outputCSV = $basepath + "export.csv"
$text = "Beginning script execution: " + (Get-Date).tostring("MM-dd-yyyy-hh-mm-ss")
Write-Output $text > $logfile
# Uncomment the below if you want to be prompted for credentials
# $cred = Get-Credential
# Comment the below if you uncomment the above
# Read credentials from file
# Adapted from http://bsonposh.com/archives/338
$File = $basepath + "cred.txt"
$password = Get-Content $File | ConvertTo-SecureString
$cred = New-Object System.Management.Automation.PSCredential("username of your O365 admin whose credentials are stored",$password)
# End of reading credentials from file
# Make sure the Azure PS module is loaded
Check-LoadedModule MSOnline
# Connect to Azure
Connect-MsolService -Credential $cred
$s = New-PSSession -ConfigurationName Microsoft.Exchange -ConnectionUri https://ps.outlook.com/powershell -Credential $cred -Authentication Basic -AllowRedirection
$importresults = Import-PSSession $s -AllowClobber
# You’ll need to adjust the Where-Object clause below to suit your purposes
Get-msoluser -all -unlicensedusersonly | Where-Object { $_.userPrincipalName.Split("@")[1] -eq $domainSuffix } | select UserPrincipalName | Export-Csv $outputCSV -NoTypeInformation
$unlicUsers = Import-Csv $outputCSV
If ( $enableEMail )
{
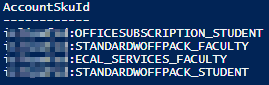
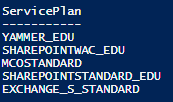
$licOptions = New-MsolLicenseOptions -AccountSkuId tenant:STANDARDWOFFPACK_STUDENT -DisabledPlans MCOSTANDARD
}
Else
{
$licOptions = New-MsolLicenseOptions -AccountSkuId tenant:STANDARDWOFFPACK_STUDENT -DisabledPlans MCOSTANDARD,EXCHANGE_S_STANDARD
}
$count = 0
Foreach($user in $unlicUsers)
{
$count++
$upn = $user.UserPrincipalName
Set-MsolUser -UserPrincipalName $upn -UsageLocation US
Set-MsolUserLicense -UserPrincipalName $upn -AddLicenses tenant:STANDARDWOFFPACK_STUDENT -LicenseOptions $licOptions
Set-MsolUserLicense -UserPrincipalName $upn -AddLicenses tenant:OFFICESUBSCRIPTION_STUDENT
If ( $enableEMail )
{
Do
{
Start-Sleep -Seconds 15
}
Until (Get-Mailbox -Identity $upn)
Set-Mailbox -Identity $upn -WindowsEmailAddress $upn
}
$text = "Account created for " + $upn
Write-Output $text >> $logfile
}
$text = "`nA total of " + $count + " users were created."
Write-Output $text >> $logfile
Remove-PSSession $s
$text = "Ending script execution: " + (Get-Date).tostring("MM-dd-yyyy-hh-mm-ss")
Write-Output $text >> $logfile
You’ll need to change a few things to fit your environment:
- Set $basepath to the directory from which you’re executing the script, which must contain your cred.txt file created earlier.
- In the line beginning with $cred, you’ll need to enter the username of the O365 administrator whose credentials you stored earlier in cred.txt.
- Set $enableEMail to $true if you want e-mail accounts created for newly licensed users.
- Substitute your actual tenant name anywhere you see “tenant” in the script.
- Adjust the various $licOptions and Set-MsolUserLicense lines as needed. My previously linked blog post should help in sorting this out.
- The most complicated part is probably adjusting the Where-Object clause to retrieve only the specific users you want to focus on. This is going to depend on your specific setup. We are using a different UPN suffix for our students, so this is relatively easy in our case.
So what’s the script actually doing?
- First, we retrieve the credentials stored previously in cred.txt.
- Then we check if the AD PowerShell module is loaded, and load it if it’s not.
- Next, we connect to Azure.
- We then export a list of unlicensed users meeting our criteria to a temp file.
- That temp file is then read back in, and each user in the file is licensed according to the parameters set.
- All output is logged to a dated log file. (You’ll want to manually clean these up periodically as the script doesn’t provide for this.)
You can run this script interactively to make sure everything is working. Once you’re comfortable that it is, setup a scheduled task to execute the script. The program executed should be powershell.exe at the path shown below. The argument should be the script itself, preceded by a “.\” – without this things will not work. Don’t ask why. Set the script’s directory in the “Start in” field.
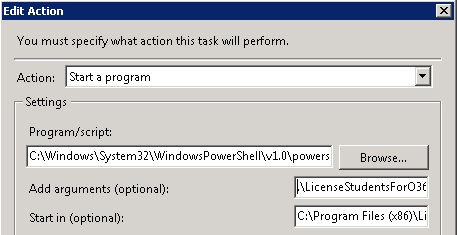
You can set the trigger to whatever you like, depending on when and how often you want this to run. The other critical piece is to run the task as the AD user under which you created the original cred.txt file. You may also need to check “Run with highest privileges.”
Since the user situation is a little confusing let me attempt to clarify it:
- You need to create the cred.txt file as a valid AD user, and then subsequently run the task as the same user.
- The credentials entered when you create cred.txt need to be an O365 admin account, and the username for that account needs to be entered into the script itself.
If your O365 account admin’s password expires, you’ll have to update cred.txt to reflect the new password. I don’t see a way around this short of using an AD-synced account with password expiration disabled.
That should do it! This definitely requires a bit of work upfront but should making keeping up with new users much easier. If you find this useful or have any questions, please let me know.